


")


Understanding how to identify minerals is one of the most essential skills in geology. Minerals form the building blocks of rocks, and learning to distinguish them allows us to interpret Earth’s history, environment, and geological processes. Whether you’re a geology student, a collector, or simply curious about Earth’s treasures, this guide offers a complete introduction to mineral identification — from physical properties to step-by-step observation techniques.
What Is Mineral Identification?
Mineral identification is the process of determining the name and characteristics of a mineral based on its observable and measurable properties. Each mineral has a unique set of physical traits — such as color, hardness, luster, streak, cleavage, and crystal form — that can be used like a fingerprint.
By carefully examining these properties, geologists can distinguish between thousands of known minerals found in nature. The goal of a mineral identification chart is to organize these observations in a logical, easy-to-follow way.
Why Identifying Minerals Matters
Every mineral tells a story. Identifying minerals helps us understand:
- Rock formation and type: Minerals determine whether a rock is igneous, sedimentary, or metamorphic.
- Geological processes: Certain minerals form only under specific temperature and pressure conditions.
- Economic value: Many valuable resources — such as gold, quartz, or bauxite — are identified through mineralogical studies.
- Environmental interpretation: Minerals can reveal past water presence, volcanic activity, or metamorphism.
Learning mineral identification is not just about naming specimens — it’s about reading the planet’s geological diary.
Essential Tools for Mineral Identification
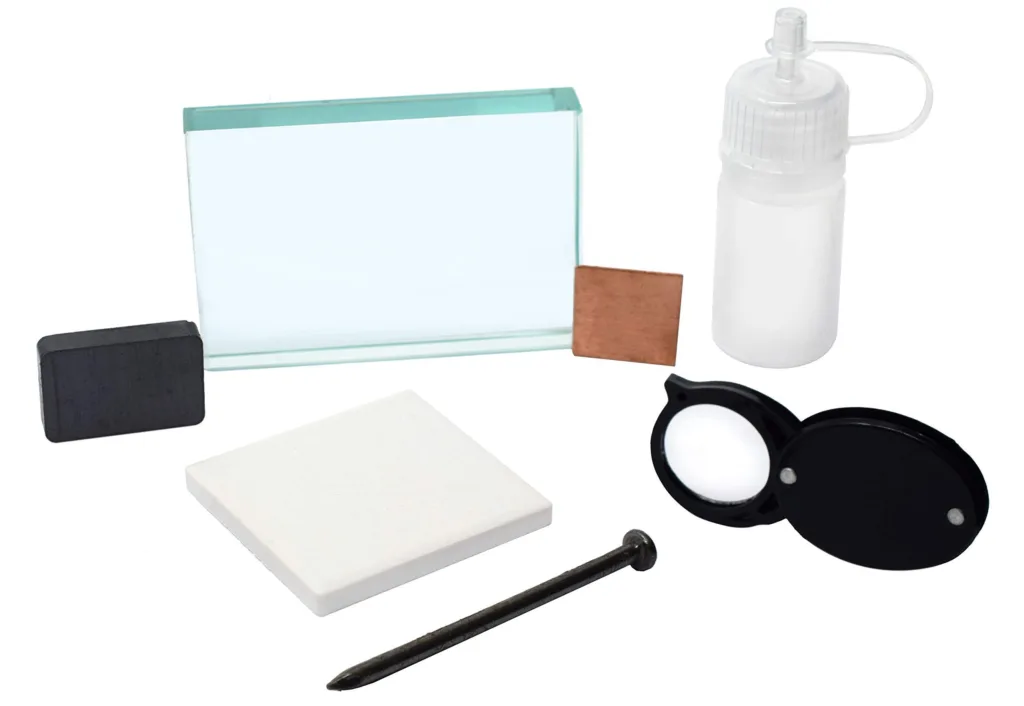
Before using a mineral identification chart, it helps to gather a few basic tools:
- Hand lens (10× magnification) – For viewing small crystals or grain structures.
- Hardness kit or nail/penny/glass plate – For testing hardness according to Mohs scale.
- Streak plate (unglazed porcelain) – To check the color of a mineral’s powder.
- Magnet – To test for magnetic minerals like magnetite.
- Acid (dilute HCl) – To detect carbonate minerals that fizz on contact.
- Field notebook – To record location, rock type, and observations.
These simple tools allow even beginners to make accurate identifications in the field or at home.
Key Physical Properties Used in Mineral Identification
Below is a summary of the main properties that appear in most mineral identification charts.
1. Color
Color is often the first thing we notice, but it can be misleading. Many minerals display multiple colors due to impurities. For example, quartz may appear colorless, purple (amethyst), pink (rose quartz), or smoky.
Tip: Always use color as a supportive clue, not the main criterion.
2. Luster

Luster describes how light reflects from a mineral’s surface.
Common types include:
- Metallic – shiny like metal (e.g., pyrite)
- Vitreous – glassy (e.g., quartz)
- Pearly – like the inside of a shell (e.g., talc)
- Dull/Earthy – no shine (e.g., kaolinite)
Luster helps quickly separate metallic minerals from non-metallic ones.
3. Streak
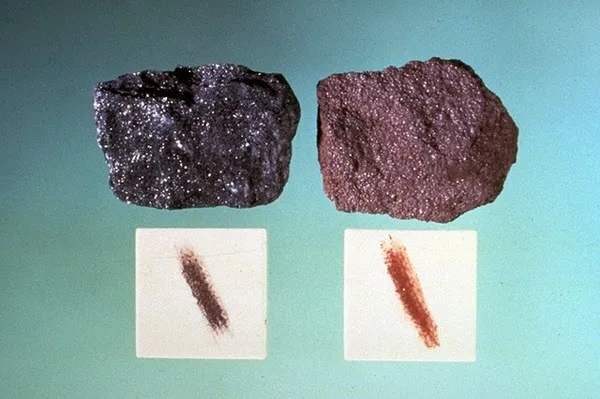
The streak test reveals the color of a mineral’s powdered form by rubbing it on a streak plate.
For example:
- Hematite may appear metallic silver but has a reddish-brown streak.
- Pyrite gives a black or greenish-black streak.
The streak is often more consistent than the surface color and highly diagnostic.
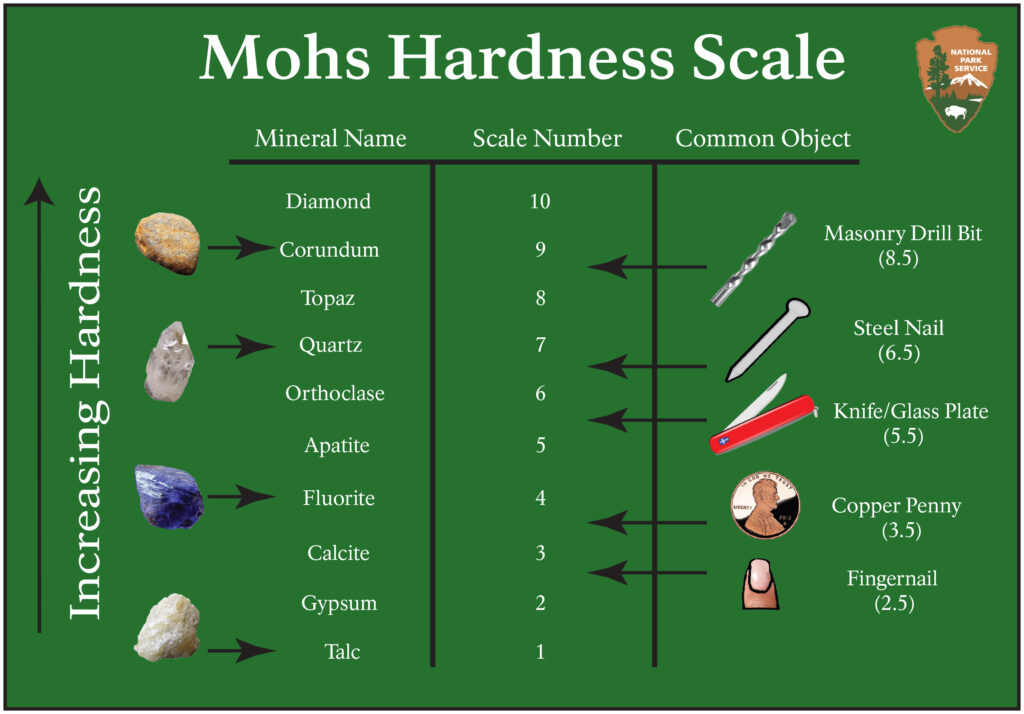
4. Hardness
Hardness measures resistance to scratching and is compared using Mohs Hardness Scale (from 1 to 10):
| Mohs Value | Reference | Example Mineral |
|---|---|---|
| 1 | Talc | Very soft, can be scratched by a fingernail |
| 2 | Gypsum | Also scratched by nail |
| 3 | Calcite | Scratched by copper coin |
| 4 | Fluorite | Scratched by knife |
| 5 | Apatite | Barely scratched by knife |
| 6 | Orthoclase | Scratches glass |
| 7 | Quartz | Hard, easily scratches glass |
| 8 | Topaz | Very hard |
| 9 | Corundum | Second hardest mineral |
| 10 | Diamond | Hardest natural material |
Testing hardness gives an immediate clue about a mineral’s identity.
5. Cleavage and Fracture
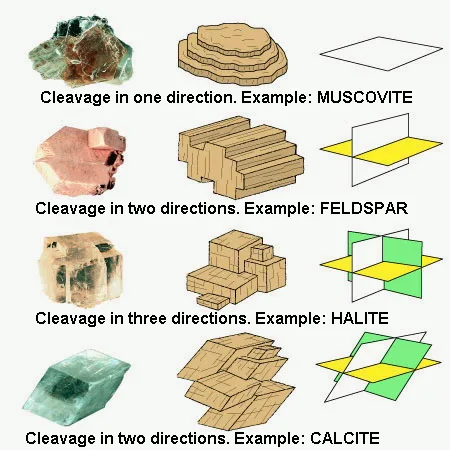
Cleavage is how a mineral breaks along specific planes of weakness, forming smooth, flat surfaces.
Fracture occurs when it breaks irregularly.
Examples:
- Mica splits into thin sheets (perfect cleavage).
- Quartz breaks with conchoidal fracture — curved, glass-like surfaces.
6. Crystal Form
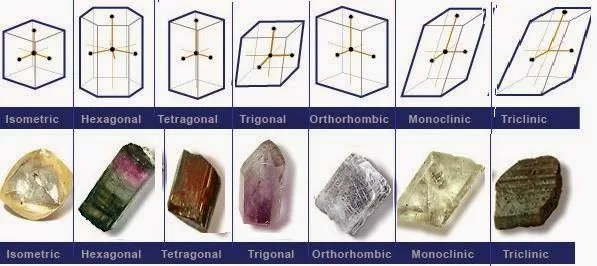
Each mineral has a characteristic internal atomic structure that often expresses itself in the external crystal shape (cubic, hexagonal, prismatic, etc.).
For instance:
- Halite forms cubic crystals.
- Quartz typically shows hexagonal prisms.
- Pyrite often occurs as shiny cubes.
Crystal form, when visible, is a strong diagnostic property.
7. Density or Specific Gravity
This property describes how heavy a mineral feels compared to its size.
For example, galena (lead sulfide) feels noticeably heavier than quartz of similar volume.
8. Reaction to Acid
Carbonate minerals like calcite and dolomite fizz when a drop of dilute hydrochloric acid is placed on them.
This simple test is a quick way to confirm carbonates in limestone or marble.
How to Use a Mineral Identification Chart (Step-by-Step)
Follow this sequence to make an accurate identification:
- Observe color and luster.
Decide if the mineral is metallic or non-metallic. - Check hardness.
Test if it scratches glass, a coin, or fingernail. - Perform streak test.
Record the streak color. - Examine cleavage or fracture.
Observe how it breaks or reflects light. - Test reaction with acid.
Note if it fizzes or remains unchanged. - Estimate density.
Feel its weight compared to other minerals. - Compare all data with chart.
Match your observations with known minerals.
Over time, this process becomes intuitive. Experienced geologists often recognize minerals by habit, color, and texture alone — but every identification starts with careful observation.
Example of a Simple Mineral Identification Chart
| Property | Quartz | Calcite | Feldspar | Pyrite | Hematite | Talc |
|---|---|---|---|---|---|---|
| Color | Colorless, pink, smoky | White | Pink, white | Brass yellow | Red, metallic | White, green |
| Luster | Vitreous | Vitreous | Glassy | Metallic | Metallic to earthy | Pearly |
| Hardness | 7 | 3 | 6 | 6–6.5 | 5–6 | 1 |
| Streak | White | White | White | Black | Reddish brown | White |
| Cleavage | None | Perfect in 3 directions | 2 directions | None | None | Perfect |
| Acid Reaction | No | Strong effervescence | None | None | None | None |
This table demonstrates how different minerals show distinct physical signatures that can be quickly cross-referenced.
Common Mistakes Beginners Make
Even seasoned collectors sometimes misidentify minerals. Here are a few common pitfalls to avoid:
- Relying too much on color – Many minerals show wide color variations.
- Skipping streak tests – Powder color often reveals the truth.
- Not cleaning the specimen – Dirt or oxidation can hide luster or streak.
- Testing too hard – Scratching with force may damage the specimen unnecessarily.
- Ignoring context – Rock type and environment help narrow possibilities.
Patience and consistency are the keys to success.
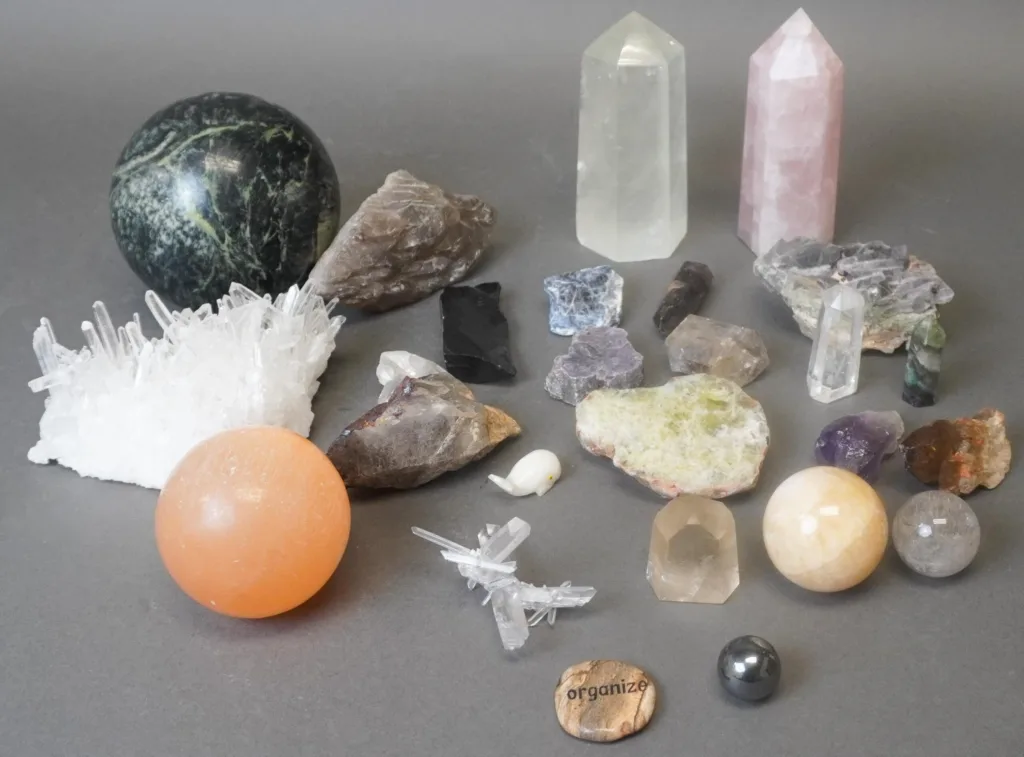
Learning Through Practice
Like learning a new language, mineral identification improves with exposure. Try organizing a small collection with labeled samples, practice field observations, and visit geology museums or university collections. Over time, you’ll begin to notice subtle differences that distinguish one mineral from another.
Digital Mineral Identification Tools
Today, several online tools and mobile apps assist beginners with mineral ID. These platforms allow users to input hardness, luster, color, and other traits, generating a shortlist of possible minerals.
However, digital tools should complement, not replace, traditional observation. Real-world practice remains the best teacher.
Conclusion
Identifying minerals connects us with Earth’s deep history and natural beauty. With a simple chart, a few tools, and curiosity, anyone can learn to recognize the minerals that shape our world — from sparkling quartz to metallic pyrite.
Whether you’re a beginner geologist, a rock collector, or just fascinated by nature’s details, mineral identification offers endless opportunities for discovery.
FAQ Section
❓ What is a mineral identification chart?
A mineral identification chart is a visual or tabular guide that helps identify minerals by comparing their physical properties—such as color, luster, hardness, streak, and cleavage. It acts like a checklist, making it easier for beginners to recognize minerals in the field or at home.
❓ How can you identify a mineral easily?
You can identify a mineral by observing its color and luster, testing its hardness on the Mohs scale, checking the streak color on a porcelain plate, and examining how it breaks (cleavage or fracture). Combining these simple observations usually reveals the mineral’s identity.
❓ What tools do you need for mineral identification?
Basic tools include a hand lens, streak plate, glass plate, magnet, and a small bottle of dilute hydrochloric acid. These help measure properties like hardness, streak color, and reaction to acid—all crucial for accurate identification.
❓ What is the most reliable property for identifying minerals?
Hardness and streak are among the most reliable properties. Color can vary due to impurities, but hardness and streak are consistent and provide clear diagnostic clues when comparing unknown minerals with known examples.
❓ Why is mineral identification important in geology?
Mineral identification helps geologists understand rock composition, formation environments, and Earth’s geological history. It’s also essential for mining, environmental studies, and material science.


